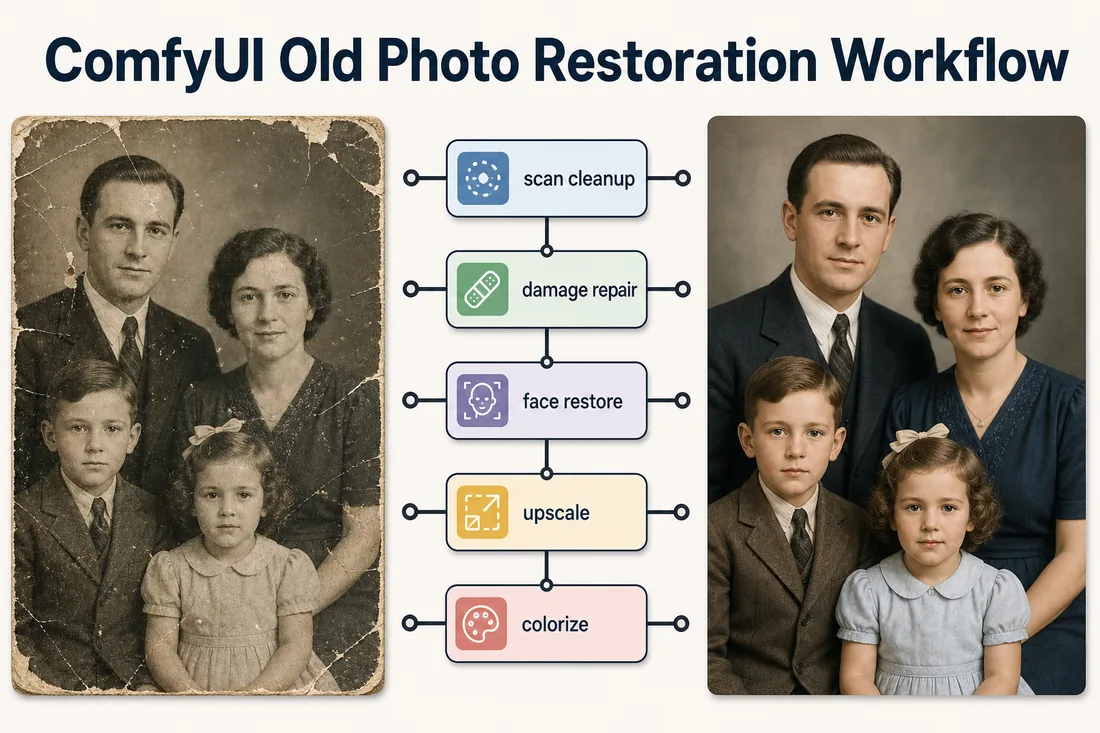
The best ComfyUI old photo restoration workflow is not one magic node. For most family photos, the safest setup is a modular pipeline: prepare the scan, repair visible damage, restore faces conservatively, upscale after cleanup, then colorize only if you want an interpreted color version.
Use ComfyUI when you want local control, repeatable settings, and batch-friendly workflows. Use a simpler online restoration tool when you need a fast result and do not want to manage custom nodes, model paths, or VRAM limits.
Best ComfyUI Workflow for Old Photo Restoration
A strong old photo restoration ComfyUI workflow should be conservative first and creative second. Old photos often contain irreplaceable facial details, clothing, handwritten marks, studio backdrops, and paper texture. If you run a high-denoise generative pass too early, the output can look cleaner but less historically faithful.
For most portraits and family scans, start with this workflow order. It gives each stage a narrow job, which makes the result easier to judge and easier to fix.
- Input preparation: crop the scan, rotate it, remove empty scanner borders, and keep a lossless original copy.
- Scan cleanup: correct exposure, faded contrast, yellowing, and heavy color cast before generative repair.
- Damage restoration: use an old-photo restoration node or mask-based inpainting for scratches, cracks, stains, torn corners, and paper damage.
- Face restoration: use GFPGAN, CodeFormer, or another face-restoration node at restrained strength so the subject remains recognizable.
- Upscaling: use ESRGAN, SUPIR, tiled upscale, or another upscaler after major cleanup so you do not enlarge scratches and dust.
- Optional colorization: use DDColor or a colorization workflow after the restored black-and-white version is saved.
- Final review: compare the result to the original at 100 percent zoom and reject any pass that changes identity, age, clothing, or important background details.
For portraits, do not judge only by thumbnail view. A face can look impressive at small size while the eyes, mouth, or age have changed at full resolution.
Want the Fast Version?
ComfyUI gives control, but a focused restoration tool is faster when you just need one old family photo cleaned up.
Restore Old Photos NowWhich ComfyUI Nodes Should You Use?
There is no single best ComfyUI photo restoration workflow node for every old picture. A cracked group photo, a faded black-and-white wedding portrait, and a low-resolution scanned ID photo need different modules. Use the table below as the practical starting point.
| Photo problem | Recommended ComfyUI module | Why it helps | Main risk |
|---|---|---|---|
| Scratches, cracks, stains | Old photo restoration node, Bringing Old Photos Back to Life style node, or mask + inpainting | Targets physical damage rather than only sharpening the whole image | May invent texture in missing areas |
| Soft or blurry faces | GFPGAN, CodeFormer, or a face restoration node | Improves facial readability when the original still has enough structure | Can change identity if strength is too high |
| Low-resolution scan | ESRGAN, SUPIR, Ultimate SD Upscale, or tiled upscale | Creates a larger printable file after damage has been cleaned | Can amplify noise or create waxy detail |
| Faded contrast | Color correction, levels, contrast, or restoration preprocessing nodes | Restores tonal range before heavier AI repair | Too much contrast can crush old paper texture |
| Black-and-white photo | DDColor or a dedicated colorization workflow | Adds plausible color after the restored monochrome version is saved | Color is interpreted, not historically proven |
| Missing corners or torn areas | Manual mask + inpainting | Limits reconstruction to damaged regions | Weak masks can alter important original details |
The best old photo restoration ComfyUI workflow maps the visible damage to a specific node instead of applying every model to every image.
If your image has several problems, handle the least speculative task first. Correct faded tone before upscaling. Repair obvious scratches before face restoration. Save a restored monochrome copy before colorization. This sequence gives you checkpoints and avoids losing the original character of the photo.
Step-by-Step ComfyUI Setup
The exact installation steps depend on your operating system and GPU, but the setup pattern is usually the same. Install ComfyUI, add the needed custom nodes, place model files in the expected folders, then load a workflow JSON or PNG workflow.
- Install ComfyUI: start from the official ComfyUI documentation if you are new to the interface.
- Add ComfyUI Manager: many users rely on it to install and update custom nodes, but still check each node's GitHub instructions before downloading models.
- Install restoration nodes: consider a ComfyUI old photo restoration node such as a Bringing Old Photos Back to Life implementation, plus separate face and upscale nodes.
- Download required models: restoration nodes, GFPGAN or CodeFormer, upscalers, ControlNet models, and colorization models may each require separate files.
- Load the workflow: drag a workflow JSON or metadata-enabled PNG into ComfyUI, then resolve missing node warnings one by one.
- Run a small test: test at reduced size before processing a high-resolution archive scan.
Best Settings for Preserving Identity
The hardest part of old photo restoration with face ComfyUI workflows is not making the image sharp. It is making the image sharper while keeping the person the same. Face-restoration models can fill in eyes, skin texture, and mouth detail, but when the source is weak they may infer a plausible face rather than recover the original one.
Use these safe settings principles first:
- Start with low or moderate restoration strength: push strength only when the source face still matches after comparison.
- Keep denoise low in generative stages: high denoise can remake facial structure, hair, clothing, and backgrounds.
- Run face restoration after damage cleanup: scratches across the face can mislead a face model.
- Compare against the original scan: check eyes, nose, mouth, jawline, expression, age, and hairline.
- Avoid beauty terms: words like flawless, cinematic, glamorous, young, or perfect can move the result away from restoration.
- Save intermediate outputs: keep pre-face, post-face, upscaled, and colorized versions so you can step back.
A technically impressive output is not automatically a good family-photo restoration. If relatives would say the subject looks like a different person, reduce face restoration strength or return to a less aggressive checkpoint.
Workflow Examples by Photo Type
The old photo restoration comfyui workflow latest results you see online often show only the best example. In real use, you should adapt the node chain to the source photo.
| Source photo | Suggested order | Notes |
|---|---|---|
| Faded portrait with soft face | Contrast cleanup -> damage repair -> conservative face restoration -> 2x upscale | Keep skin texture and original age. Avoid heavy beautification. |
| Cracked family group photo | Scan cleanup -> mask cracks -> inpaint damage -> light face restoration per person -> upscale | Group photos need extra face checking because each person may drift differently. |
| Black-and-white wedding photo | Monochrome restoration -> face cleanup -> upscale -> optional DDColor | Save the restored black-and-white version before colorization. |
| Low-resolution school portrait | Damage cleanup -> mild face restoration -> tiled upscale -> final contrast | Upscale after cleanup so dust and scratches are not enlarged. |
| Photo with stains and important background | Manual masks -> localized repair -> global tone correction -> optional upscale | Use masks to avoid replacing historically useful background details. |
Use different ComfyUI node chains for different old-photo problems instead of treating restoration as one universal preset.
If you only need a quick restoration for scratches, fading, or blur, a dedicated repair damaged photos page or old photo enhancer can be faster than configuring a local node graph.
Common Problems and Fixes
Most ComfyUI restoration failures come from missing custom nodes, misplaced model files, GPU memory limits, or over-aggressive settings. Troubleshoot in small steps instead of changing the entire workflow at once.
| Problem | Likely cause | Fix |
|---|---|---|
| Missing node warning | The workflow uses a custom node you have not installed | Install the named node, restart ComfyUI, and reload the workflow. |
| Model not found | Model file is missing or placed in the wrong folder | Read the node README and put the checkpoint, upscaler, or face model in the expected directory. |
| Out of memory | Image resolution, tiled settings, or model size exceeds VRAM | Use a smaller test image, tile the upscale, lower batch size, or use a cloud ComfyUI option. |
| Plastic-looking faces | Face restoration or denoise strength is too high | Reduce strength and compare against the original at 100 percent zoom. |
| Over-sharpened scratches | Upscaling happened before damage cleanup | Repair scratches first, then upscale. |
| Colorization looks modern | Color model guessed overly saturated contemporary colors | Use subtler colorization or keep the restored monochrome image as the archive version. |
| Background changed | High denoise or broad inpainting mask altered original context | Use tighter masks and lower denoise; restore only damaged areas. |
When an Online Restoration Tool Is Better
ComfyUI is powerful when you want repeatable local control, but it is not always the fastest path. If you are restoring one or two family photos, installing custom nodes and downloading models can take longer than the restoration itself.
Use an online tool when:
- You want a fast result and do not need a reusable node graph.
- You are working on scratches, fading, stains, or mild blur rather than a custom batch workflow.
- You do not want to manage Python dependencies, model paths, or GPU memory.
- You need a simple workflow for a non-technical family member.
For simpler jobs, start with AI old photo restoration. For targeted tasks, use remove scratches from photos, colorize old photos, or old photo to new photo. ComfyUI is best when you want deeper control over those stages.
Useful Background Sources
Old photo restoration is harder than ordinary enhancement because damage can be structured, such as scratches and dust, or unstructured, such as blur, fading, noise, and paper aging. The paper Old Photo Restoration via Deep Latent Space Translation is useful background for understanding why specialized restoration workflows matter.
For ComfyUI mechanics, use the official ComfyUI docs. For node-specific setup, read the custom node repository before installing models. Community workflow pages can be useful examples, but always verify dependencies and settings against the current node documentation.
Frequently Asked Questions
Build the Workflow Around the Photo, Not the Other Way Around
A good ComfyUI old photo restoration workflow should protect the original person and the original moment. Start with the least invasive cleanup, use restoration nodes for visible damage, apply face restoration carefully, upscale after repair, and colorize only after you have a clean restored version. If that setup feels heavier than the job requires, use a focused old photo restoration tool and save ComfyUI for the photos that need custom control.

Sarah Mitchell
Sarah writes about AI photo restoration, family-photo preservation, and practical workflows for repairing old images without losing identity or historical context.