The best AI photo restoration technique is not always the strongest one. For old family photos, the safer approach is to identify the damage first, repair the narrowest problem, and compare every result with the original scan before moving to the next step.
Quick answer: clean and scan first, remove scratches and stains next, restore face detail gently, colorize only after cleanup, and finish with a fidelity check before printing or sharing.
In this guide
- Quick Answer: Which AI Technique Should You Use First?
- AI Photo Restoration Technique Matrix
- The Safest Order for AI Old Photo Restoration
- How to Preserve Identity and Historical Detail
- When to Use Online AI, Manual Editing, or Local Workflows
- Common AI Restoration Mistakes to Avoid
- FAQ
- Bottom Line: Use the Smallest Useful AI Fix
Quick Answer: Which AI Technique Should You Use First?
The best AI photo restoration technique is not always the strongest one. For old family photos, the safer approach is to identify the damage first, repair the narrowest problem, and compare every result with the original scan before moving to the next step.
Choose the first technique by damage type
| Photo problem | Best first technique | Why this order matters | Next step |
|---|---|---|---|
| Thin scratches or fold lines | Scratch removal / damage cleanup | Lines can be amplified by sharpening or colorization if left in place | Review at 100% zoom before enhancement |
| Soft scan or low contrast portrait | Gentle enhancer and contrast recovery | Improves readability without inventing a new face | Compare eyes, mouth, hairline, and clothing |
| Missing corner, tear, or stain | Inpainting-style repair or manual retouching | Nearby context guides a more believable repair | Keep an untouched archive scan |
| Clean black-and-white photo | Colorization after cleanup | Color prediction works better after scratches and stains are removed | Treat color as interpretation, not proof |
The safest technique is the narrowest one that fixes the visible problem.
Quick answer: clean and scan first, remove scratches and stains next, restore face detail gently, colorize only after cleanup, and finish with a fidelity check before printing or sharing.
AI Photo Restoration Technique Matrix
AI photo restoration techniques are easier to judge when you separate physical damage from image-quality problems. Physical damage includes scratches, tears, cracks, stains, and missing paper. Image-quality problems include blur, fading, grain, weak contrast, and uneven color.
| Technique | Use it for | Avoid it when | Good internal match |
|---|---|---|---|
| Scratch and dust removal | Surface lines, dust, fold marks, small cracks | The print has not been safely digitized | Remove scratches from photos |
| Face restoration | Soft but recognizable eyes, mouth, and skin detail | The face is mostly missing or identity is uncertain | Old photo enhancer |
| Deblur and upscaling | Camera shake, low-resolution scans, small prints | Scratches and dust are still visible | Unblur photos |
| Colorization | Clean black-and-white portraits or scenes | Historically exact color matters | Colorize old photos |
| Damage repair / inpainting | Missing corners, tears, stains, torn backgrounds | The missing area contains critical unknown text or faces | Repair damaged photos |
Choose the method by damage type, not by the most impressive preview.
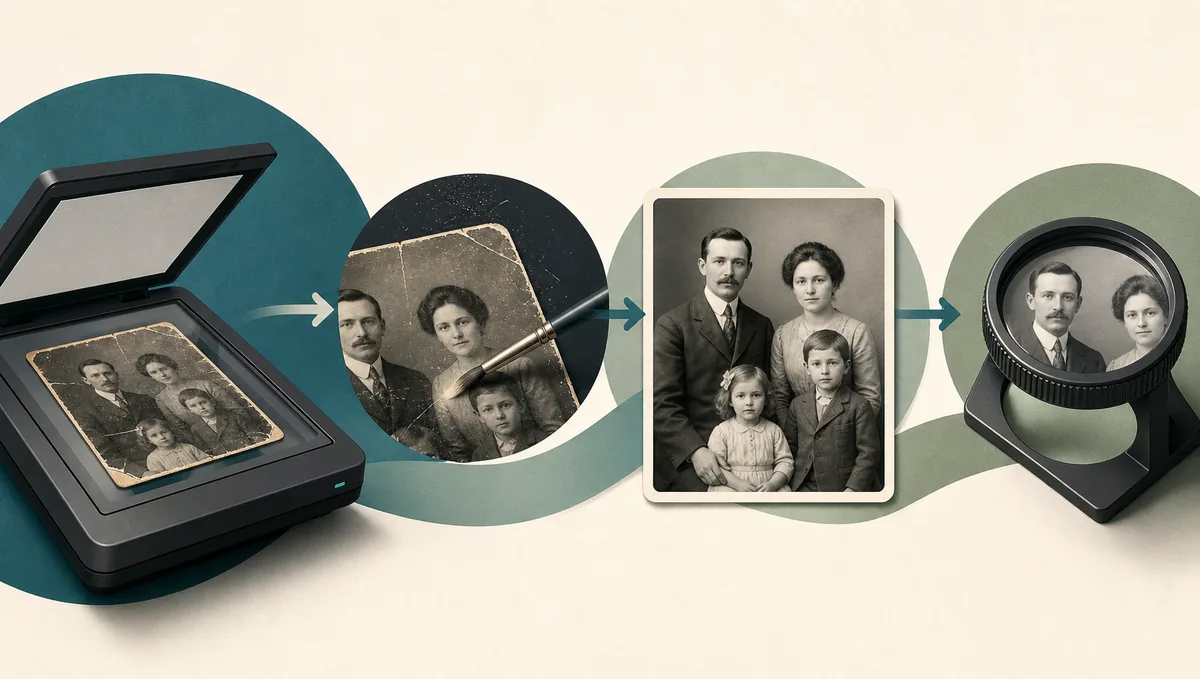
The Safest Order for AI Old Photo Restoration
A reliable workflow protects the original record first and improves appearance second. Save one untouched scan, duplicate it, and do every restoration pass on the copy.
- Create a high-quality scan or camera copy before risky physical cleaning.
- Remove loose dust and visible scratches before sharpening, upscaling, or colorization.
- Repair tears, stains, and missing paper while preserving nearby context.
- Use face restoration only after major damage is gone and keep the setting conservative.
- Adjust contrast, tone, and color last, then compare with the original at normal size and 100% zoom.
This order explains why one method should happen before another, which is what prevents many AI outputs from looking polished but wrong.
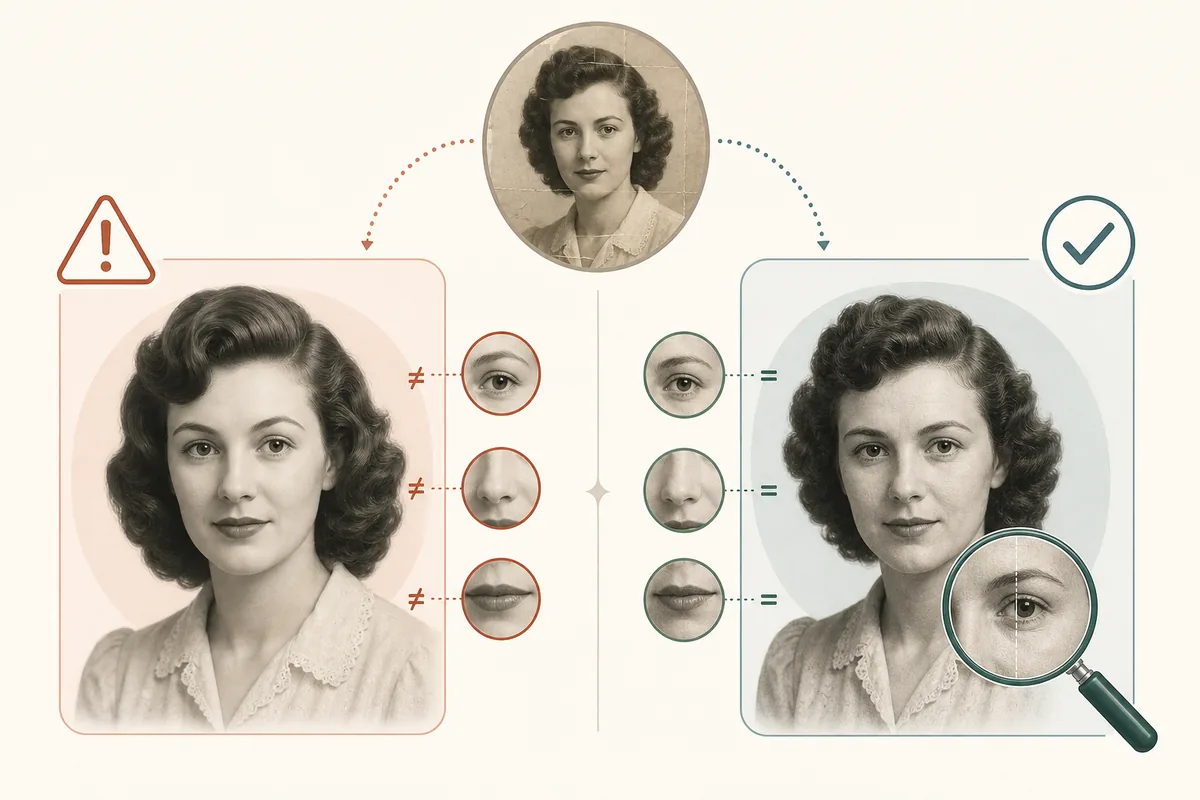
How to Preserve Identity and Historical Detail
The most important quality check is identity preservation. A restored photo can look clear and still be a bad restoration if the person no longer looks like the original subject.
Use this fidelity checklist before downloading:
- Does the restored face match the original expression and age?
- Did the AI remove meaningful details such as medals, buttons, handwriting, or furniture?
- Are repaired areas plausible but consistent with the surrounding grain?
- Did colorization create colors that should be treated as guesses rather than facts?
- Would a family member recognize the restored person without being told who it is?
For genealogy, memorial, legal, or archive use, keep the restored file and the original scan together. The restored version is an access copy; the original remains the evidence copy.
When to Use Online AI, Manual Editing, or Local Workflows
Online AI restoration is ideal when you need fast cleanup for common family-photo damage. Manual editors are better when the photo is valuable, ambiguous, or historically sensitive. Local workflows can help with privacy and repeatability.
| Situation | Best approach | Reason |
|---|---|---|
| A box of faded family snapshots | Online AI restoration | Fast enough to process many photos and review the best results |
| One irreplaceable wedding portrait | Manual retouching plus conservative AI | Human review protects faces, fabric, jewelry, and background detail |
| Private archive or research collection | Local workflow | Files can stay on your machine and settings can be repeated |
| Prompt-based creative tools | Prompt plus strict identity instructions | Useful for controlled restoration, but review is mandatory |
The best tool depends on risk, privacy, and historical accuracy.
If you are comparing software, test one scratched photo, one faded portrait, one black-and-white photo, and one damaged print.
Common AI Restoration Mistakes to Avoid
Most failed AI restorations come from doing too much too early. Sharpening before cleanup makes scratches harder to remove. Colorizing before scratch repair gives cracks false colors.
Avoid these common mistakes:
- Uploading the only copy instead of a duplicate file
- Using the strongest face or beauty setting by default
- Cropping away damaged borders before repair
- Treating AI colorization as historically confirmed color
- Skipping the 100% zoom comparison before printing
- Deleting the original scan after the restored image looks good
The goal is not to make an old photo look brand new at any cost. The goal is to make the real memory easier to see.
FAQ
Bottom Line: Use the Smallest Useful AI Fix
AI photo restoration works best when each technique has a job. Remove physical damage before enhancement, restore faces conservatively, colorize only after cleanup, and keep the original scan as the source record.

Sarah Mitchell, Lifestyle & Family Heritage Writer
Sarah writes practical guides for families digitizing and restoring old photo collections with a conservative, archive-first workflow.